FamilyChristmasOnlineTM and LittleGlitterHouses.comTM | |||||||


|
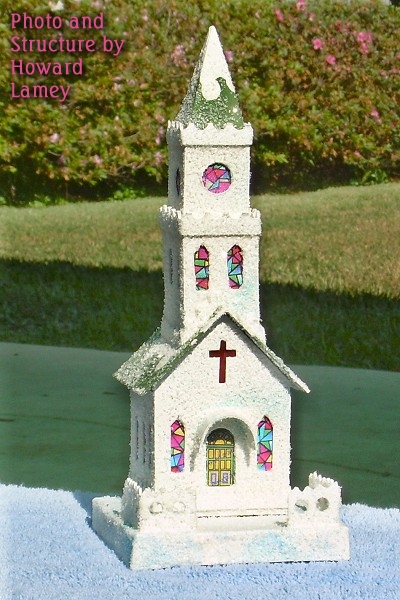
Note from Editor: Howard Lamey, in Jacksonville, Florida, has an artist's eye for proportion and charm. He also has the good taste to be one of my readers. I met Howard online when he told me he had used a stained glass pattern from our Free Graphics Resource Page pattern on a vintage-style cardboard church he had built. For this project, a mutual friend asked Howard to design an organic-looking stable for her nativity figures. Soon after he completed it, Howard sent me the photographs and his notes, and I lost them until a few months ago. Sorry about that. The project is held together mostly by Elmer's glue, which takes a bit of time to dry between steps, so we recommend going from base to roof, to base to roof, so you can be doing something productive on one bit while the other bit is drying. - Paul Build a Twig Stable for Your NativityThis project was all about having a natural, organic-looking place to display a family's antique nativity figures. The base is covered with sawdust and other natural materials. The frame and fence are made from twigs. And the roof is cardboard covered with burlap and topped off with another sawdust mix.All of those materials need to be glued together a few bits at a time, and the glue has to have time to dry in between, so this isn't a project you'll finish in one evening. But if you keep reading ahead, and going back and forth between the base and roof tasks, you'll still make good progress. What You Will NeedFor this project you'll need:
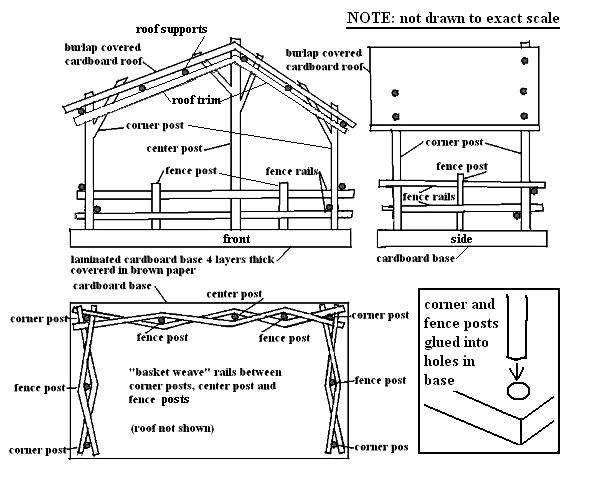
Printing the PlanThe actual size you make this will depend on the size of the largest figure you plan to use. On our example, our standing figures were about 6" high. But if your figures are 8" or 4" tall, you'll want to adjust things.The first graphic is not to any kind of scale - it's just to show you how the whole thing will go together. For example, the overhead view of the base shows where you'll need to drill holes for the fence posts and building posts. For your convenience, we have made a pdf version that you can print. The result will be low resolution, but it will be easy to work with. Study this one to make certain you can see where everything goes. When you compare it to the photographs, you'll see differences, but it will give you the basic idea.
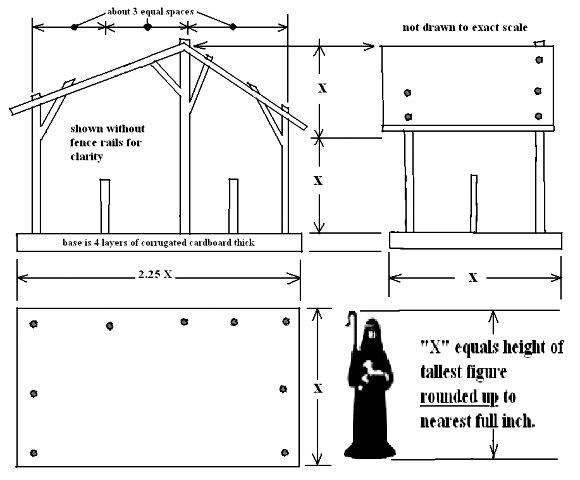
The next graphic comes in two versions. One version shows measurements to use if your figures are 6" tall. If your figures are much taller or much shorter, use the other version. It has Xs where the measurements would go, so you can measure your figures and fill in the measurements you need to use.
If you have trouble seeing or printing the plans, contact Paul and ask him for help - that's his department. :-) Building the BaseThe base is decorated before the posts are installed. It should be about 6"x12", or larger if you would like.You may form the base either of two ways:
Then wait until the paint dries. Then set the base aside until it dries and start on the roof (below). By the time you are at the first "wait until the glue dries" stage in the roof construction, it will probably be time to knock of anyway. If you can keep going back and forth this way, you'll cut the actual calendar time for assembling this project in something like half. When your base is completely dry, spread Elmer�s Glue-All over the top and sides of the base and sprinkle your sawdust mix over it. Press the mix into the glue a little and make sure there aren't any major "holes" in coverage. When that dries, "Mist" the sawdust mix with brown, dark green, light brown, and yellow spray paint in a random pattern. (You can see how the variegated colors look on my base in the "finished" project photos further down.) The posts should not be attached to the base until the base is finished. Installing the Posts and Fence RailsMy posts and rails were made from freshly cut pieces of ligustrum hedge. Other species of hedges or branches from small trees, such as willow, could be used. The pieces need to be flexible and not dried out since some bending and flexing will be needed to assemble stable.
Use white glue on all joints and surfaces that contact, wipe off excess and let it dry between construction steps. Note: - In the photo to the right, you can see that I didn't finish this base before installing the posts. Chalk that one up to "lessons learned" - it was tricky to get the base finished the way I wanted after the posts were installed.
Paul suggests that you could use grapevine for this, with the caveat that it will shift around as it dries for the first year or two.
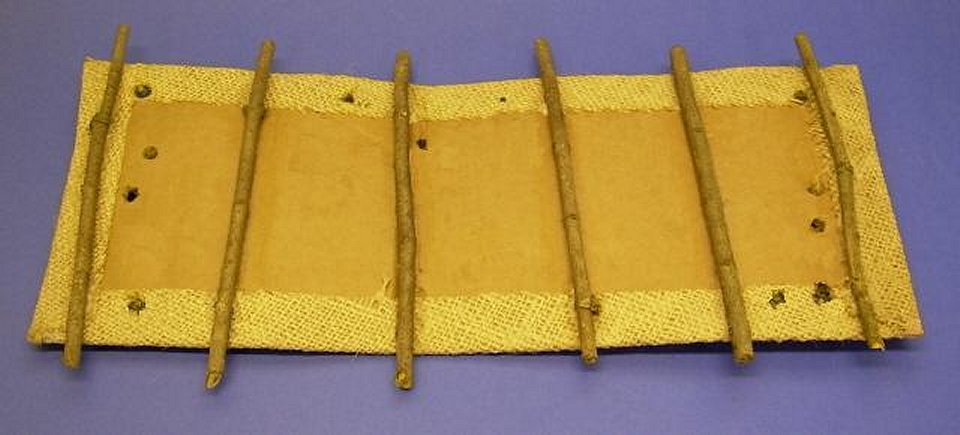
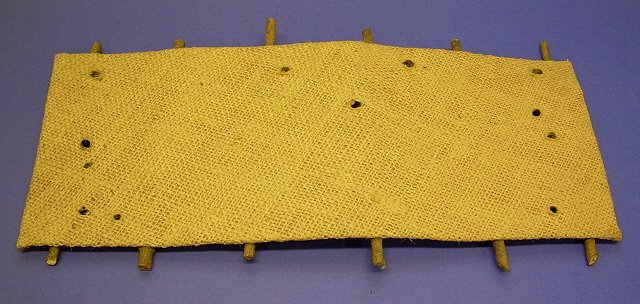
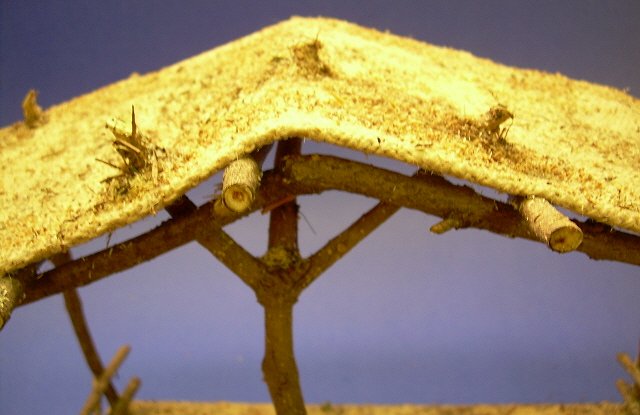
Building the RoofThe roof is made from one layer of corrugated cardboard coved with burlap. After you've cut your piece out (6"x15" in this example), crease it where you want the peak of the roof to be, then wrap burlap around one side of it and glue it down. Bend the roof back into what you imagine the final position will be while the glue is still drying. You don't have to be perfect - you just don't want to wait until the thing dries out flat and then try to bend it into shape.While the glue is drying, build a "test roof" from something easier to work with, say the cardboard from a cereal box. That way you can locate the holes and see where you will need, eventually, to nip off the tips of the posts. When you feel like you have the location of the holes plotted out, and the glue on your burlap is dry, transfer the pattern of holes to your roof. Make certain things line up, then take the roof back off of the posts. Add six cross-members ("rafters") to the roof and glue them in place. Once again wait for the glue to dry, probably overnight.
Raising the RoofOnce the cross-members of the roof are firmly attached, reattach the roof and glue it in place. You may need to use clamps, rubber bands, or masking tape to keep everything where you want it to be while the glue is drying - you guessed it - probably overnight. I am usually working on several projects at a time, so I have something else to work on while the glue is drying on one project.
Add a 1/4-inch diameter twig trim that goes from corner post to corner post along the front and back just below roof line. You'll need to clamp the "beam" in place while it dries. This provides a tiny bit more stability to the roof shape, but mostly it provides a more finished look to the edge.
If you click on the photo to the right, you'll be able to get a better look at the variegated coloring on the base. If you want to add a little protection to the surface, you can spray the finished project with some flat acrylic spray. Use a few light coats rather than one or two heavy coats.. Don't use a satin or glossy spray, and don't saturate the finish, or you'll lose the "natural appearance" in one coat.
ConclusionOur friend was quite happy with the finished project. And it feels sturdier than it looks, so we hope she'll be able to pass it along with the figures to the next generation.
Perhaps you had a pasteboard house collection when you were young and would like to have a replica made. Or you have an idea for something that's never been done. If you can find a photo or hash out a drawing or anything else to give me some idea of what you're looking for, that can be enough to get started. If you'd like me to help you design and/or build a special vintage pasteboard house for you, or if you have any questions at all, please see my site, LittleGlitterHouses.com for more information. Looking for Your Ideas, Projects, or Photos - Also, if you have similar project, ideas, or photos that you'd like to share with your fellow readers and hobbyists, we'd love to add them to our sites, and we'll be sure to give you full credit for your contribution. For More Information:
Several other crafts are listed on our Christmas Craft Resources page. We have more patterns and craft suggestions in the works. So keep checking back. And contact us with any questions or suggestions you have in the meantime. Especially contact us if you have any craft ideas you'd like to share with our readers. Paul and Shelia Race To return to the Family Christmas OnlineTM Home Page, click here.
|

 |
|||||
Note: Family Christmas OnlineTM is a trademark of Breakthrough Communications(tm) (www.btcomm.com).
All information, data, text, and illustrations on this web site are
Copyright (c) 2006, 2007, 2008, 2009, 2010, 2011, 2012, 2013 by Paul D. Race.
Reuse or republication without prior written permission is specifically
forbidden.
Family Christmas Online(tm) is a participant in the Amazon Services LLC Associates Program, an affiliate advertising program designed to provide a means for sites to earn advertising fees by advertising and linking to amazon.com.
For more information, please contact us
| Visit our affiliated sites: | ||||||
| - Christmas Memories and Collectibles - | ||||||
 |

|

|

|

|

|
|
| - Family Activities and Crafts - | ||||||
 |

|

|

|

|

|
|
| - Trains and Hobbies - | ||||||

|

|

|  |

|
 |
|
| - Music - | ||||||

|

|
 |

|

|
 |
|